
REST API PART -II
Table of contents
- What is REST?
- Creating a Students API
- Creating a resource
- Setting up database
- JDBC connectivity
- Adding to the resource class
- Creating a Repository
- Testing the API
In this tutorial, we will deep dive into the basics of creating a Java Rest API using JAX-RS and MySQL. Hoping that you have read my previous post “A definitive guide for Web Services development” – if you haven’t please go back to part 1 for setting your environment.
So far, we have created a dynamic web project called BackendREST and we could make a http get request to the server running on localhost port 8080 and we get a response saying “hello world!” text on your browser.
Now, let’s dig deeper into the concept of REST API.
What is REST? — REST stands for Representational State Transfer Protocol
REST is an architectural style in which a client and server should communicate. In a typical client-server architecture, server has resources/web services and is ready for serving requests. When a client sends a http request to the server, it accepts the request and sends back a response i.e the server will transfer to the client a representation of the state of the requested resource. The request and response are usually in xml, json, html or plain text format.
A HTTP Request from a client to the server comprises of a URL (Uniform Resource Locator) and a Method (can be GET, POST, PUT and DELETE)
We will discuss more basics while we work on it. First, let’s create a Students API where information of students is stored in a MySQL database and a Client can access this API using HTTP methods. Our goal is to add, delete, update and retrieve students information from the database.
Step 1. As we discussed earlier, when client requests for a resource, the server transfers representation of the object’s state. In our case the object is Student. So let’s create Student object by creating a Students class with attributes.
I am using the same project BackendREST from Part-I of this tutorial. In the src folder–> in com.example.backend –> create a new class. Name it Student.java

If you are aware of the MVC architecture, the Student.java class is the model for this application. Here we define Student attributes such as name, id and marks. Getters and Setters are methods used to map the inputs provided by the client to instantiate the Student object with its corresponding attributes. These methods would also help to retrieve and update values of a variable.
import javax.xml.bind.annotation.XmlRootElement;


@XmlRootElement        // specifying that Student is the root element
public class Student {

private String name;
private Integer marks;
private Integer id;

public String getName() {
return name;
}
public void setName(String name) {
this.name = name;
}
public Integer getMarks() {
return marks;
}
public void setMarks(Integer marks) {
this.marks = marks;
}
public Integer getId() {
return id;
}
public void setId(Integer id) {
this.id = id;
}
}
Step 2. Creating a resource – The next step is to create a Resource class. In the resource class we have to mention the path , resource methods that should be triggered whenever you do a GET/PUT/POST/DELETE, the return type (XML/JSON).
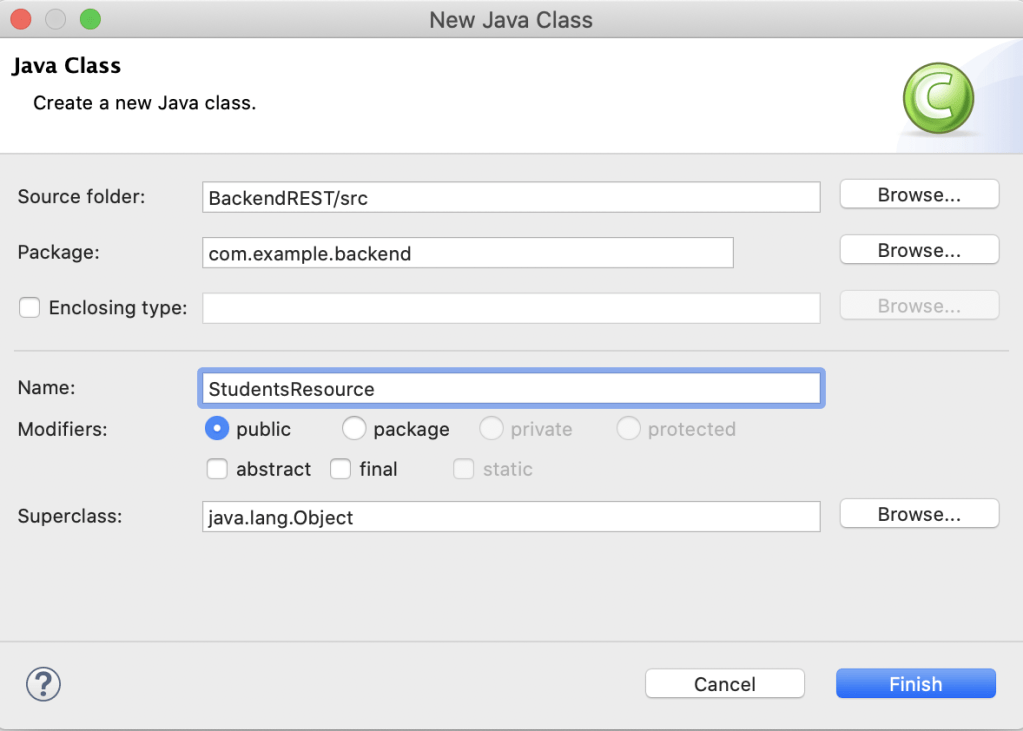
So, create a class called StudentsResource.java in the same package com.example.backend
Now, let’s try returning a Student object in xml format when I provide /students in the URL. To do that we have to create a @Path(“students”) and getStudents() method in the StudentsResource.java class
FYI: @Path(" ") – Identifies the URI path that a resource class or class method will serve requests for. Import "import javax.ws.rs.Path;" package.
@GET – Indicates that the annotated method responds to HTTP GET requests.
@Produces – Defines the media type(s) that the methods of a resource class or javax.ws.rs.ext.MessageBodyWriter can produce.
package com.example.backend;
import javax.ws.rs.GET;
import javax.ws.rs.Path;
import javax.ws.rs.Produces;
import javax.ws.rs.core.MediaType;
@Path("/students") //URI for getStudents method
public class StudentsResource {
@GET // is the method type given to the getStudents
@Produces(MediaType.APPLICATION_XML) // the getStudents method returns the students object in XML format
public Students getStudents()
{
Students s1 = new Students(); // assigning a student object statically
s1.setName("Drake");
s1.setId(100);
s1.setMarks(75);
return s1;
}
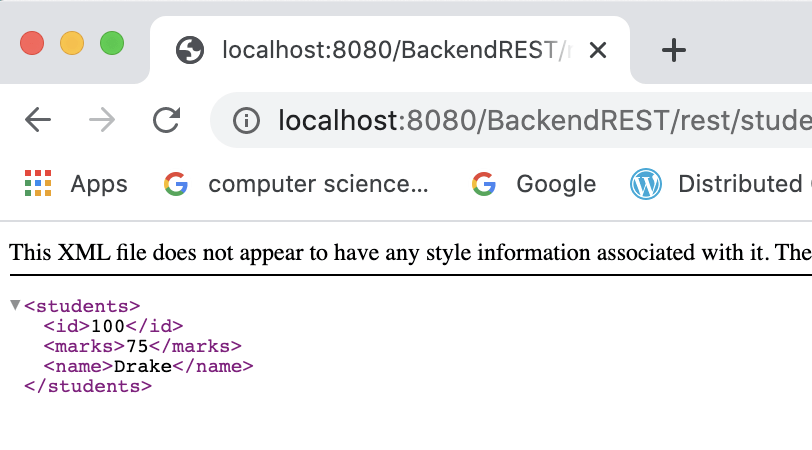
}Now, let’s run the project and check if we can get the Students object (s1) in xml format. Save everything, right click on BackendREST project –> Run As –>Other –> Run on Server –> Select your server –> click finish
Make sure your local host is running. Type in the URL as localhost:8080/BackendREST/rest/students
You should see a student object response in XML format like below.
Step 3. Setting up database – In this tutorial, we will be using MySQL database. If you haven’t downloaded it yet. Go to part 1 of this tutorial for instructions on how to download MySQL.
Open your MySQL workbench or Terminal and create a students database and then create a table called student_details. In the students_details table we will have the ID, Name, Marks as attributes/ column names.
(Attention: Make sure your MySQL is running on default port 3306) Place the below snippet in you mysql file and execute the query. You should see two student entries in your table.
Create database students;
use students;
create table student_details (id integer, name varchar(20), marks integer);
insert into student_details values(100, "Drake" , 75);
insert into student_details values(101, "Beyonce" , 90);
select * from student_details;
Step 4. Accessing database using JDBC–
We will be using MySql database and JDBC for storing our data. In order to integrate MySql database to your application, you need MySql connector.
Add the below highlighted MySql connector dependency in your pom.xml file. After saving the file, you should see the dependency added to Maven dependencies folder in the package explorer.
Your pom.xml should look like this.
<project xmlns="http://maven.apache.org/POM/4.0.0" xmlns:xsi="http://www.w3.org/2001/XMLSchema-instance" xsi:schemaLocation="http://maven.apache.org/POM/4.0.0 https://maven.apache.org/xsd/maven-4.0.0.xsd">
  <modelVersion>4.0.0</modelVersion>
  <groupId>BackendREST</groupId>
  <artifactId>BackendREST</artifactId>
  <version>0.0.1-SNAPSHOT</version>
  <packaging>war</packaging>
  <dependencies>
    <dependency>
        <groupId>org.glassfish.jersey.containers</groupId>
        <artifactId>jersey-container-servlet</artifactId>
        <version>2.25.1</version>
    </dependency>
    <!-- https://mvnrepository.com/artifact/org.glassfish.jersey.media/jersey-media-json-jackson -->
<dependency>
    <groupId>org.glassfish.jersey.media</groupId>
    <artifactId>jersey-media-json-jackson</artifactId>
    <version>2.25.1</version>
</dependency>
<!-- https://mvnrepository.com/artifact/mysql/mysql-connector-java -->
<dependency>
    <groupId>mysql</groupId>
    <artifactId>mysql-connector-java</artifactId>
    <version>8.0.15</version>
</dependency>
</dependencies>
 <build>
    <sourceDirectory>src</sourceDirectory>
    <plugins>
      <plugin>
        <artifactId>maven-compiler-plugin</artifactId>
        <version>3.8.1</version>
        <configuration>
          <source>1.8</source>
          <target>1.8</target>
        </configuration>
      </plugin>
      <plugin>
        <artifactId>maven-war-plugin</artifactId>
        <version>3.2.3</version>
        <configuration>
          <warSourceDirectory>WebContent</warSourceDirectory>
        </configuration>
      </plugin>
    </plugins>
  </build>
</project>
Step 5. Resource Class – Now, let’s change our previously created StudentsResource.java class and add resources/method declaration to it. This class should contain all the http methods that will server all the requests coming to the server.
Below is the code for the class.
package com.example.backend;

import java.util.List;
import javax.ws.rs.Consumes;
import javax.ws.rs.DELETE;
import javax.ws.rs.GET;
import javax.ws.rs.POST;
import javax.ws.rs.PUT;
import javax.ws.rs.Path;
import javax.ws.rs.PathParam;
import javax.ws.rs.Produces;
import javax.ws.rs.core.MediaType;

@Path("students")
public class StudentsResource {
StudentRepo repo = new StudentRepo();

@GET
@Produces({MediaType.APPLICATION_XML, MediaType.APPLICATION_JSON})
public List<Student> getStudents()
{
return repo.getStudents();
}

/* Getting a student by id */

@GET
@Path("student/{id}")
@Produces({MediaType.APPLICATION_JSON, MediaType.APPLICATION_XML})
public Student getStudent(@PathParam("id")int id) {
return repo.getStudent(id);
}

//send data to repo
//POST - Add student to the repo

@POST
@Path("student")
@Consumes({MediaType.APPLICATION_XML,MediaType.APPLICATION_JSON })
public Student addStudent(Student a) {
repo.createStudent(a);
return a;
}

@DELETE
@Path("student/{id}")
public Student deleteStudent(@PathParam("id") int id) {
Student a = repo.getStudent(id); //checking if id is there in the db
if(a.getId()!=0)
repo.deleteStudent(id);
return a;
}

@PUT
@Path("student")
//put is similar to create and update

@Consumes({MediaType.APPLICATION_XML,MediaType.APPLICATION_JSON })
public Student updateStudent(Student a) {
Student found = repo.getStudent(a.getId());
if(found == null ) //if no student is found, create a new one
{
repo.createStudent(a);
} else {
 repo.updateStudent(a);
} return a;
}
}
Step 6. Creating a Repository – Now let’s create a StudentRepository.java class. This repository class consists of all the database connectivity logic. We will write methods for – getStudents() , getStudent() by id, addStudent() , deleteStudent() and updateStudent().
In order to access our MySQL – students database through our Java code we need a JDBC connection. There are seven steps for a successful JDBC connection.
1. Import driver
2. Load and register the driver
3. Create connection
4. Create statement
5. Execute statement
6. Process the result
7. Close statement and connection
In the StudentsRepository.java class place the below code. Observe the code and read the comments.
package com.example.backend;
import java.sql.*; //Step 1. Importing SQL package
import java.util.ArrayList;
import java.util.List;
public class StudentRepo {
Connection con;
public StudentRepo() {
String url = "jdbc:mysql://localhost:3306/students?serverTimezone=UTC"; //URL string to students database
String user = "root";
String password = "";
try {
Class.forName("com.mysql.cj.jdbc.Driver"); // Step 2. load and register the driver
try {
con = DriverManager.getConnection(url, user, password);
}
catch (SQLException e){
e.printStackTrace();
}
} catch (ClassNotFoundException e)
{ // TODO Auto-generated catch block
e.printStackTrace();
}
}
/* getStudents method for getting a list of students from student_details table */
public List<Student> getStudents()
{
List<Student> students = new ArrayList<>();
try {
String sql = "select * from student_details"; //sql query for retrieving all the students
Statement st = con.createStatement(); // Step 4. create statement
ResultSet rs = st.executeQuery(sql); //Step 5. execute statement and store it in rs
while(rs.next()) // Step 6. process the result
{
Student a = new Student();
a.setId(rs.getInt(1));
a.setName(rs.getString(2));
a.setMarks(rs.getInt(3));
students.add(a);
}
}
catch (SQLException e)
{ // TODO Auto-generated catch block
e.printStackTrace();
}
return students;
}
/* get Student by id */
public Student getStudent(int id)
{
Student a = null;
String sql = "select * from student_details where id=" +id;
try {
Statement st = con.createStatement();
ResultSet rs = st.executeQuery(sql);
if(rs.next()) {
a = new Student();
a.setId(rs.getInt(1));
a.setName(rs.getString(2));
a.setMarks(rs.getInt(3));
System.out.println(a);
}
} catch (SQLException e) {
// TODO Auto-generated catch block
e.printStackTrace();
}
return a;
}
/* Creating a Student*/
public void createStudent(Student a) { // TODO Auto-generated method stub
String sql = "insert into student_details values (?,?,?)";
try {
PreparedStatement st = con.prepareStatement(sql);
st.setInt(1, a.getId());
st.setString(2, a.getName());
st.setInt(3, a.getMarks());
st.executeUpdate();
} catch (Exception e)
{ // TODO Auto-generated catch block
System.out.println(e);
}
}
/* delete student by id */
public void deleteStudent(int id)
{ // TODO Auto-generated method stub
String sql = "delete from students where id=?";
try {
PreparedStatement st = con.prepareStatement(sql);
st.setInt(1, id);
st.executeUpdate();
} catch (Exception e)
{ // TODO Auto-generated catch block
System.out.println(e);
}
}
/*Updating student*/
public void updateStudent(Student a)
{ // TODO Auto-generated method stub
String sql = "update students set name=?, score=? where id=?";
try {
PreparedStatement st = con.prepareStatement(sql);
st.setString(1, a.getName());
st.setInt(2, a.getMarks());
st.setInt(3, a.getId());
st.executeUpdate();
} catch (Exception e) {
// TODO Auto-generated catch block
System.out.println(e);
} }
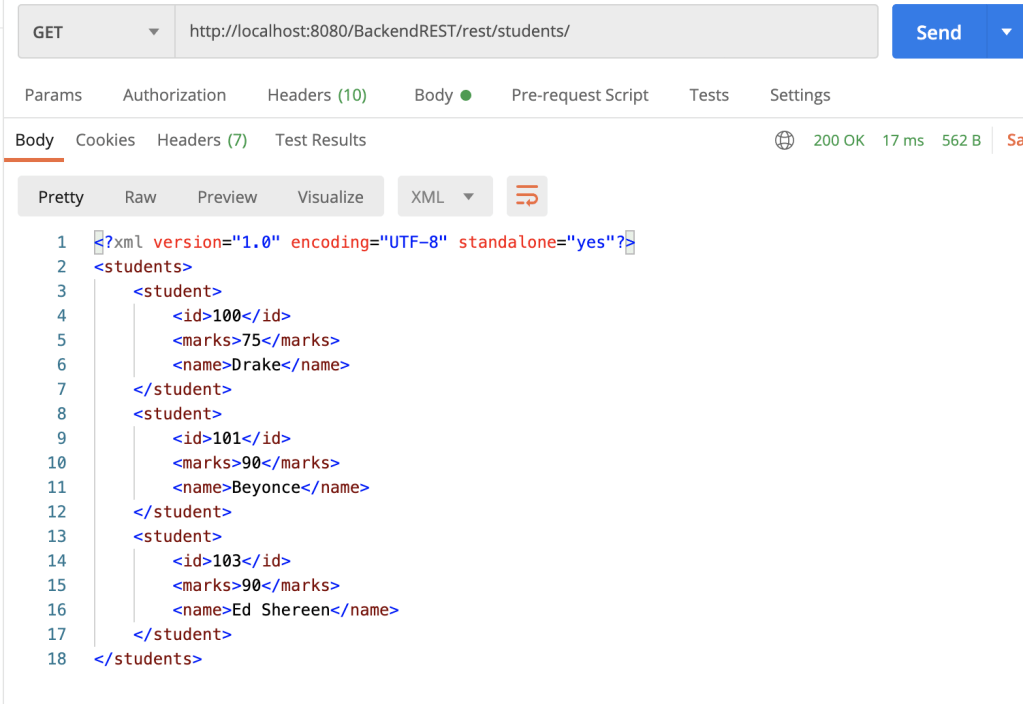
}Step 7. Testing Students API– Now comes testing our code! Use postman for testing your rest api. Here is the download link for postman https://www.postman.com/downloads/
let’s try a GET request – In your postman dashboard –> type in your URL as http://localhost8080/BackendREST/rest/students/ —> select GET from the drop down and click on send. You should see the result in the body section in XML format.
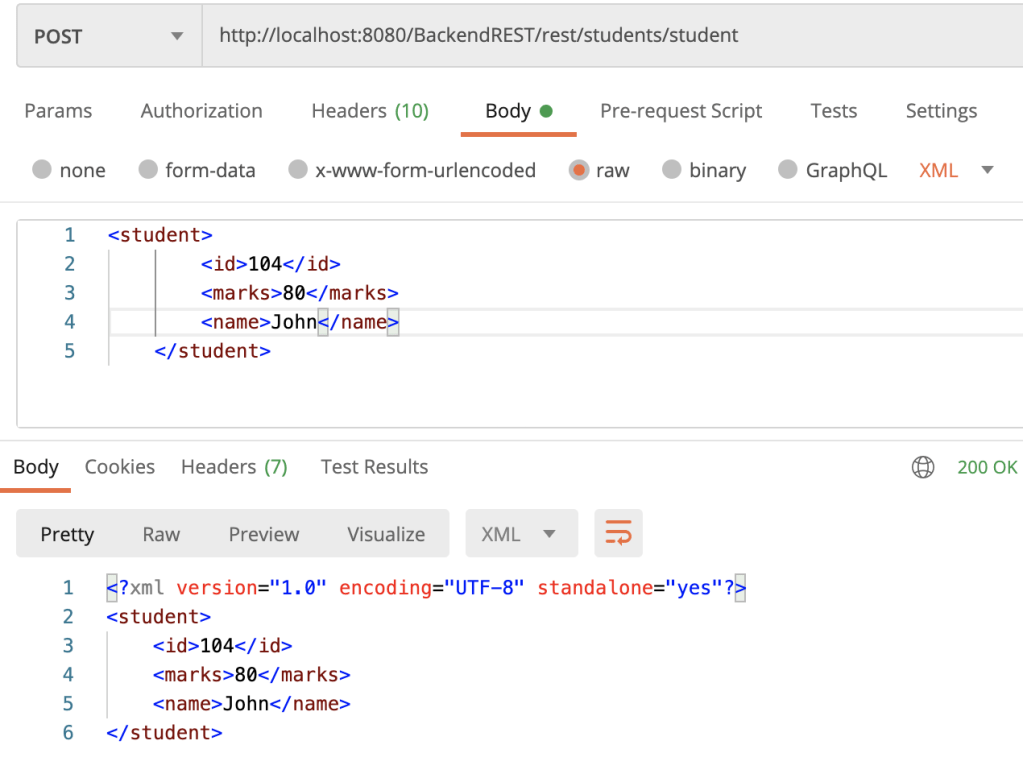
Let us also try POST — We will add student by name “John” , id – 104 , marks -80 –> select POST from the dropdown –> type in the URL http://localhost8080/BackendREST/rest/students/student (students/student is the path hierarchy for adding a student)–> click on send
You should get a 200 OK response and the Body as shown below.
Check the result again by doing a GET call and also verify in your database by doing a select * from student_details
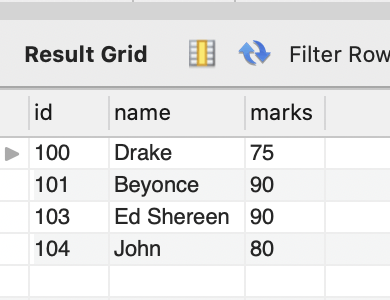
DELETE –> Deleting a student by id. Give in the URL as shown below –> the path is /rest/students/student/104
John should be deleted and the response should be 200 OK. Verify again using GET /rest/students/

Now, you try doing a PUT request from postman and post your results in the comment section!
Hope, this tutorial helped you in understanding the steps involved in building a REST API from scratch. If you have any questions please comment in the feedback section below. I will get back to you. Thanks for reading.

Very Informative and thoroughly explained
LikeLike